
Snapshot testing in XCTest

All below is worth to read, but if you request my humble opinion today on which exactly tool to use, I’d suggest going with pointfreeco.
Introduction
«It’s not a bug, it’s a feature». Almost every member of the team has already learned this phrase. And yes, curiously enough, it can be said about some amount of defects. But not about badly displayed layout. This is especially important for mobile testing, given the time-cost of delivery to the store.
We have many similar tools for testing the layout in iOS applications (by the way, Android note is here). But the most part of them forked or took an idea from only one. So, in this note I would like to talk about that — iOSSnapshotTestCase.
This tool was originally created as an open source project under the leadership of Facebook. Over time, having got into the archive, the initiative passed to Uber and the project is still successfully developing. Most pleasantly, that iOSSnapshotTestCase is inherited from XCTestCase, which obviously means, that we don’t need to make any changes into our automation system at all.
Also I would like to notice we can use iOSSnapshotTestCase as in XCUITest as in XCTest. Awesome, let’s try.
Precondition
At the beginning we should:
- add an additional pod in Podfile:
target "Tests" do
  use_frameworks!
  pod 'iOSSnapshotTestCase'
end
- and set the environment variables in our test scheme:
| Name | Value |
|---|---|
| FB_REFERENCE_IMAGE_DIR | $(SOURCE_ROOT)/$(PROJECT_NAME)Tests/Snapshots/ReferenceImages |
| IMAGE_DIFF_DIR | $(SOURCE_ROOT)/$(PROJECT_NAME)Tests/Snapshots/FailureDiffs |

Usage
The functional of saving reference snapshots is regulated by the variable recordMode, which is located in the setUp():
recordMode = true  // saving reference snapshots
recordMode = false // verifying reference snapshots with actual
To make more than one check per test we should set «identifier» as an argument of FBSnapshotVerifyView and FBSnapshotVerifyLayer methods.

XCUITest implementation
import XCTest
import FBSnapshotTestCase

class TestExample: FBSnapshotTestCase {

    override func setUp() {
        super.setUp()
        recordMode = true
        XCUIApplication().launch()
    }

    func test_Fullscreen_and_Element_Snapshot() {
        let fullscreen = XCUIApplication().screenshot().image
        let element = XCUIApplication().images["image"].screenshot().image

        FBSnapshotVerifyView(UIImageView(image: fullscreen), identifier: "fullscreen")
        FBSnapshotVerifyView(UIImageView(image: element), identifier: "element")
    }

}
XCTest implementation
import XCTest
import FBSnapshotTestCase
@testable import Product_Module_Name

class TestExample: FBSnapshotTestCase {

    override func setUp() {
        super.setUp()
        recordMode = true
    }

    func test_View_and_Layer_and_Sublayer_Snapshots() {
        let view = SampleViewController().view!
        let sublayer = CALayer()
        sublayer.frame = CGRect(x: 33, y: 33, width: 50, height: 50)
        sublayer.backgroundColor = UIColor.blue.cgColor
        view.backgroundColor = UIColor.orange
        view.layer.backgroundColor = UIColor.red.cgColor
        view.layer.addSublayer(sublayer)

        FBSnapshotVerifyView(view, identifier: "view")
        FBSnapshotVerifyLayer(view.layer, identifier: "layer")
        FBSnapshotVerifyLayer((view.layer.sublayers?.last)!, identifier: "sublayer")
    }

}
File name options
These are capabilities that allow to add distinctive features to the names of the created snapshots, depending on the required filtering. Wow 😳. If explains it on fingers and a little bit easier:
Imagine that we have a mobile application opened on the screen with the text. We see difference between fonts on iOS 9 and iOS 12. We understand that these font differences are not a bug of the app, but when verifying snapshots, the test has been failing.
To avoid this problem, we can set the agnostic option, which will add the iOS version to the name of out test snapshot. Thus, we will need to create reference snapshots for each version of iOS, and during verification, the test will look for the snapshot it needs.
Currently out of the box we have 4 types of file name options:
- FBSnapshotTestCaseFileNameIncludeOption.device
The file name should be agnostic on the device name, as returned by UIDevice.currentDevice.model.
- FBSnapshotTestCaseFileNameIncludeOption.OS
The file name should be agnostic on the OS version, as returned by UIDevice.currentDevice.systemVersion.
- FBSnapshotTestCaseFileNameIncludeOption.screenScale
The file name should be agnostic on the screen scale, as returned by UIScreen.main.scale.
- FBSnapshotTestCaseFileNameIncludeOption.screenSize
The file name should be agnostic on the screen size of the current keyWindow, as returned by UIApplication.sharedApplication.keyWindow.bounds.size.
We can use the file name options in the same way as the recordMode, by assigning them in the setUp():
override func setUp() {
  super.setUp()
  recordMode = true
  fileNameOptions = [
      FBSnapshotTestCaseFileNameIncludeOption.OS,
      FBSnapshotTestCaseFileNameIncludeOption.screenScale
  ]
}
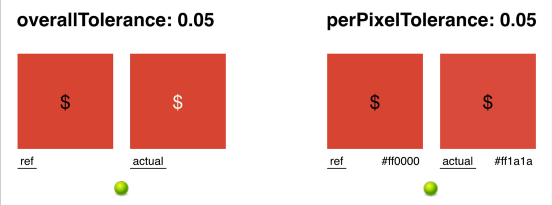
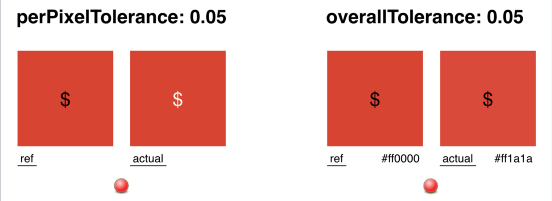
Tolerance
I mean, as far as we allow current snapshots to be different from the reference ones. It is calculated on a scale from 0 to 1, where tolerance = 0.05 is a difference in snapshots equal to 5%. By default: 0%. The tolerance is set as an argument of FBSnapshotVerifyView and FBSnapshotVerifyLayer methods. The library provide us with two realisations of this feature:
- overallTolerance — how many pixels may not match
- perPixelTolerance — how each pixel may not match
import XCTest
import FBSnapshotTestCase

class TestExample: FBSnapshotTestCase {

    func test_overallTolerance() {
        let image = XCUIApplication().screenshot().image
        FBSnapshotVerifyView(UIImageView(image: image), overallTolerance: 0.01)
    }

    func test_perPixelTolerance() {
        let image = XCUIApplication().screenshot().image
        FBSnapshotVerifyView(UIImageView(image: image), perPixelTolerance: 0.1)
    }

}
 |
 |
Tear off the «Status bar»
If we need to verify the snapshot of full screen via XCUITest, we may face the problem that we will have conflicts in the status bar (battery, time, etc.). It is possible to solve this problem, although in a slightly ridiculous way — by cutting off a few pixels that used for status bar, while taking a snapshot.
The main problem is that since «X» series of iPhone we have nonstandard size of status bar:
| Device | Size of status bar (.pixels) |
|---|---|
| iPhone < X | 22 |
| iPhone X | 44 |
| iPhone XS | 44 |
| iPhone XR | 48.6 |
| iPhone XS Max | 48.6 |
We can implement this crutch using UIImage extension:
import UIKit

extension UIImage {

    var removingStatusBar: UIImage? {
        guard let cgImage = cgImage else {
            return nil
        }

        let yOffset = 22 * scale // status bar height on standard devices (not iPhoneX)
        let rect = CGRect(
            x: 0,
            y: Int(yOffset),
            width: cgImage.width,
            height: cgImage.height - Int(yOffset)
        )

        if let croppedCGImage = cgImage.cropping(to: rect) {
            return UIImage(cgImage: croppedCGImage, scale: scale, orientation: imageOrientation)
        }

        return nil
    }
}
Thereafter, for the correct operation of this cutting on all iPhone models, we will need to learn how to determine it from our tests. To do it, we need to extend the UIDevice:
import XCTest

extension UIDevice {

    enum UIDeviceModelType : Equatable {

        case iPhoneX
        case iPhoneXR
        case iPhoneX_Max
        case other(model: String)

        static func type(from model: String) -> UIDeviceModelType {
            switch model {
            case "iPhone10,3", "iPhone10,6", "iPhone11,2":
                return .iPhoneX
            case "iPhone11,4":
                return .iPhoneX_Max
            case "iPhone11,8":
                return .iPhoneXR
            default:
                return .other(model: model)
            }
        }

        static func ==(lhs: UIDeviceModelType, rhs: UIDeviceModelType) -> Bool {
            switch (lhs, rhs) {
            case (.iPhoneX, .iPhoneX):
                return true
            case (.iPhoneX_Max, .iPhoneX_Max):
                return true
            case (.iPhoneXR, .iPhoneXR):
                return true
            case (.other(let modelOne), .other(let modelTwo)):
                return modelOne == modelTwo
            default:
                return false
            }
        }
    }

    var simulatorModel: String? {
        guard TARGET_OS_SIMULATOR != 0 else { return nil }
        return ProcessInfo.processInfo.environment["SIMULATOR_MODEL_IDENTIFIER"]
    }

    var hardwareModel: String {
        var systemInfo = utsname()
        uname(&systemInfo)
        let machineMirror = Mirror(reflecting: systemInfo.machine)
        let model = machineMirror.children.reduce("") { identifier, element in
            guard let value = element.value as? Int8, value != 0 else { return identifier }
            return identifier + String(UnicodeScalar(UInt8(value)))
        }

        return model
    }

    var modelType: UIDeviceModelType {
        let model = self.simulatorModel ?? self.hardwareModel
        return UIDeviceModelType.type(from: model)
    }

    var isIPhoneX: Bool {
        return modelType == .iPhoneX
    }

    var isIPhoneXR: Bool {
        return modelType == .iPhoneXR
    }

    var isIPhoneX_Max: Bool {
        return modelType == .iPhoneX_Max
    }

    var isXFamily: Bool {
        return modelType == .iPhoneX_Max
            || modelType == .iPhoneX
            || modelType == .iPhoneXR
    }
}
And then will use it like this:
import UIKit

extension UIImage {

    var removingStatusBar: UIImage? {
        guard let cgImage = cgImage else {
            return nil
        }

        var yOffset: CGFloat = 0
        if (!UIDevice.current.isXFamily) {
          yOffset = 22 * scale
        } else if (UIDevice.current.isIPhoneX) {
          yOffset = 44 * scale
        } else if (UIDevice.current.isIPhoneX_Max || UIDevice.current.isIPhoneXR) {
          yOffset = 48.6 * scale
        }
        let rect = CGRect(
            x: 0,
            y: Int(yOffset),
            width: cgImage.width,
            height: cgImage.height - Int(yOffset)
        )

        if let croppedCGImage = cgImage.cropping(to: rect) {
            return UIImage(cgImage: croppedCGImage, scale: scale, orientation: imageOrientation)
        }

        return nil
    }
}
Painting
Sometimes we may need to verify the snapshot of the full screen with the exception of a specific element.
Can anyone draw? And paint?) It is time to paint over, because we can solve this problem with the help of «colorings». I am not kidding 😉. For this we need:
-
to extend the UIImage once again by creating the* fill(element: XCUIElement)* method, which will paint over the chosen element on the snapshot:
import UIKit import XCTest extension UIImage { func fill(element: XCUIElement) -> UIImage { UIGraphicsBeginImageContext(self.size) self.draw(at: CGPoint.zero) let context = UIGraphicsGetCurrentContext()! context.fill( CGRect( x: Double(element.frame.minX), y: Double(element.frame.minY), width: Double(element.frame.size.width), height: Double(element.frame.size.height) ) ) let myImage = UIGraphicsGetImageFromCurrentImageContext() UIGraphicsEndImageContext() return myImage! } } -
to create a new method verifyScreen(without element: XCUIElement) near the previously created verification methods:
 func verifyScreen(without element: XCUIElement) {
   let paintedImage = XCUIApplication().screenshot().image.fill(element: element).removingStatusBar
   FBSnapshotVerifyView(UIImageView(image: paintedImage))
 }

 func verifyScreen() {
   let image = XCUIApplication().screenshot().image.removingStatusBar
   FBSnapshotVerifyView(UIImageView(image: image))
 }

 func verifyElement(_ element: XCUIElement) {
   let image = element.screenshot().image
   FBSnapshotVerifyView(UIImageView(image: image))
 }
Conclusion
To sum it up, I would say that testing with snapshots on mobiles is at least possible and at most mighty speed up our automation testing.
If you had any questions or clarifications after reading the article about the snapshot testing, I’ll be happy to answer them. And you can find the completed project here:
So, good luck, have fun and see you later (:


